


Support Topics - Video Tutorials

The basics of using ClinicSoftware.com for business: Activity & Calendar
• 7:31 mins
Using the software with a pc, tablet and smart phone as a part of the regular work-flow can eliminate downtime and save a lot of time when you manage all on the go.
READ MORE
Get started: Full training Webinar
• 03:29 hours
Preparing the Business for Growth with automation of repetitive tasks like online bookings, marketing campaigns, reminders, texts, emails, payments appointments, instalments, APIs, etc.
READ MORE
Start using Marketing Automation
• 07:08 mins
For successful business flow, the company must gather vital information on existing and potential client as well. We help solve this problem by saving all valuable customer data in the cloud when you have all in one place.
READ MOREKnowledge Base - Resolve all of your questions in no time
01. INSTALLING CLINICSOFTWARE.COM AND LOGGING IN
By default you have a primary user account from which you have full access to the software and run the setup.
READ MORE
2.2. MIGRATING DATA TO CLINICSOFTWARE.COM
After clicking on Data Migration, a page will appear where you can select the type of import you wish to perform, including clients, appointments, products, receipts, services, courses, tasks, and clinical notes.
READ MORE
2.3. CONNECTING MAILCHIMP ACCOUNT TO CLINICSOFTWARE.COM
Connect Mailchimp Account to Clinic Software CRM.
READ MORE
2.4. CONNECTING GOCARDLESS TO CLINICSOFTWARE.COM
Connect GOCARDLESS to Clinic Software CRM.
READ MORE

2.6. CONNECTING STRIPE TO CLINICSOFTWARE.COM
Connect Stripe Account to Clinic Software CRM.
READ MORE
2.7. CONNECTING XERO TO CLINICSOFTWARE.COM
To connect with Xero you have to log in to Clinicsoftware.com and go to Software Settings.
READ MORE
2.8. CONNECTING 2CHECKOUT TO CLINICSOFTWARE.COM
Connect 2CHECKOUT Account to Clinic Software CRM.
READ MORE
2.9. CONNECTING PAYPAL TO CLINICSOFTWARE.COM
Connect PAYPAL Account to Clinic Software CRM.
READ MORE
3.1. USER MENU
The User menu contains shortcuts to various pages through the application and admin area. The shortcuts are personalized for each user of the system and can be configured from the Admin Area.
READ MORE
3.2. POS SECTION
The cart lists all items that will be billed on the receipt and the total amount to be paid. When adding an item to the cart it will appear here.
READ MORE
3.3. MESSAGING
The importance of two-way communication: Two-way communication, by definition, is the interchange of information and ideas from sender to receiver and vice versa.
READ MORE
3.4. NOTES
From this page, you can leave notes for your employees. To access the notes page, click on the “NOTES” from the top menu. There are 3 types of notes: - Manager Notes - Quotations Notes - General Notes
READ MORE
3.5. SMS TEXT
From this page, you can send SMS and email messages for marketing or information purposes (appointment notifications). To access the SMS TEXT page, go to the "MARKETING" option from the navigation bar.
READ MORE
3.6. STAFF ROTA
From this section you can clock in and out the staff, set and export the shifts time schedule and view the staff clocked in/out log. To begin, first, check the selected location (defaults to the currently logged in location) for multi branch licenses.
READ MORE
3.7. PROMOTIONS/COUPONS
From this page, you can set up promotions that appear in the main "PROMOTIONS" page. The promotions represent a bundle of services, courses and products with a discount applied per bundle.
READ MORE
3.8. PATCH TEST
Patch tests are part of a course’s directory, e.g. for laser, you can have different patch tests that represent different laser types. How to add patch tests in the system will be covered in the Admin Area section of this user guide.
READ MORE
3.9. BACK BUTTON
The back button is used to take you back to the previous page. Some pages will overwrite the address, e.g. the courses admin will take you to the edit course directory page when you press the back button from the course directory courses subpage.
READ MORE
3.10. SERVICES
You can access the services page from the “SERVICES” button on the menu (see above icon). How to add services to the system will be covered in the Admin Area section of this user guide. How to book services will be covered in the Day Book section of this user guide.
READ MORE
3.11. PRODUCTS
In order to access the this feature, please press the “PRODUCTS” button on the menu. You can choose to display all the products or only the products that are part of a category by using the “Category” drop box located on the top of the page.
READ MORE
3.12. SCANNER
The scanner button when pressed will open a window from which you can scan the product barcode to add it to the cart.
READ MORE
3.13. CLIENTS
From this page, you can view, add, modify, select and access features such as consent forms and rejuvenation procedures. Clients are added on a location basis. To display only the clients that were added at your location use the “Location” drop box located at the top of the page.
READ MORE
3.14. CLIENT CONSENT FORMS
The client consent forms can be accessed by pressing the “ Available Consent Forms” button from the main software client list page and then scanning the QR code with your tablet.
READ MORE
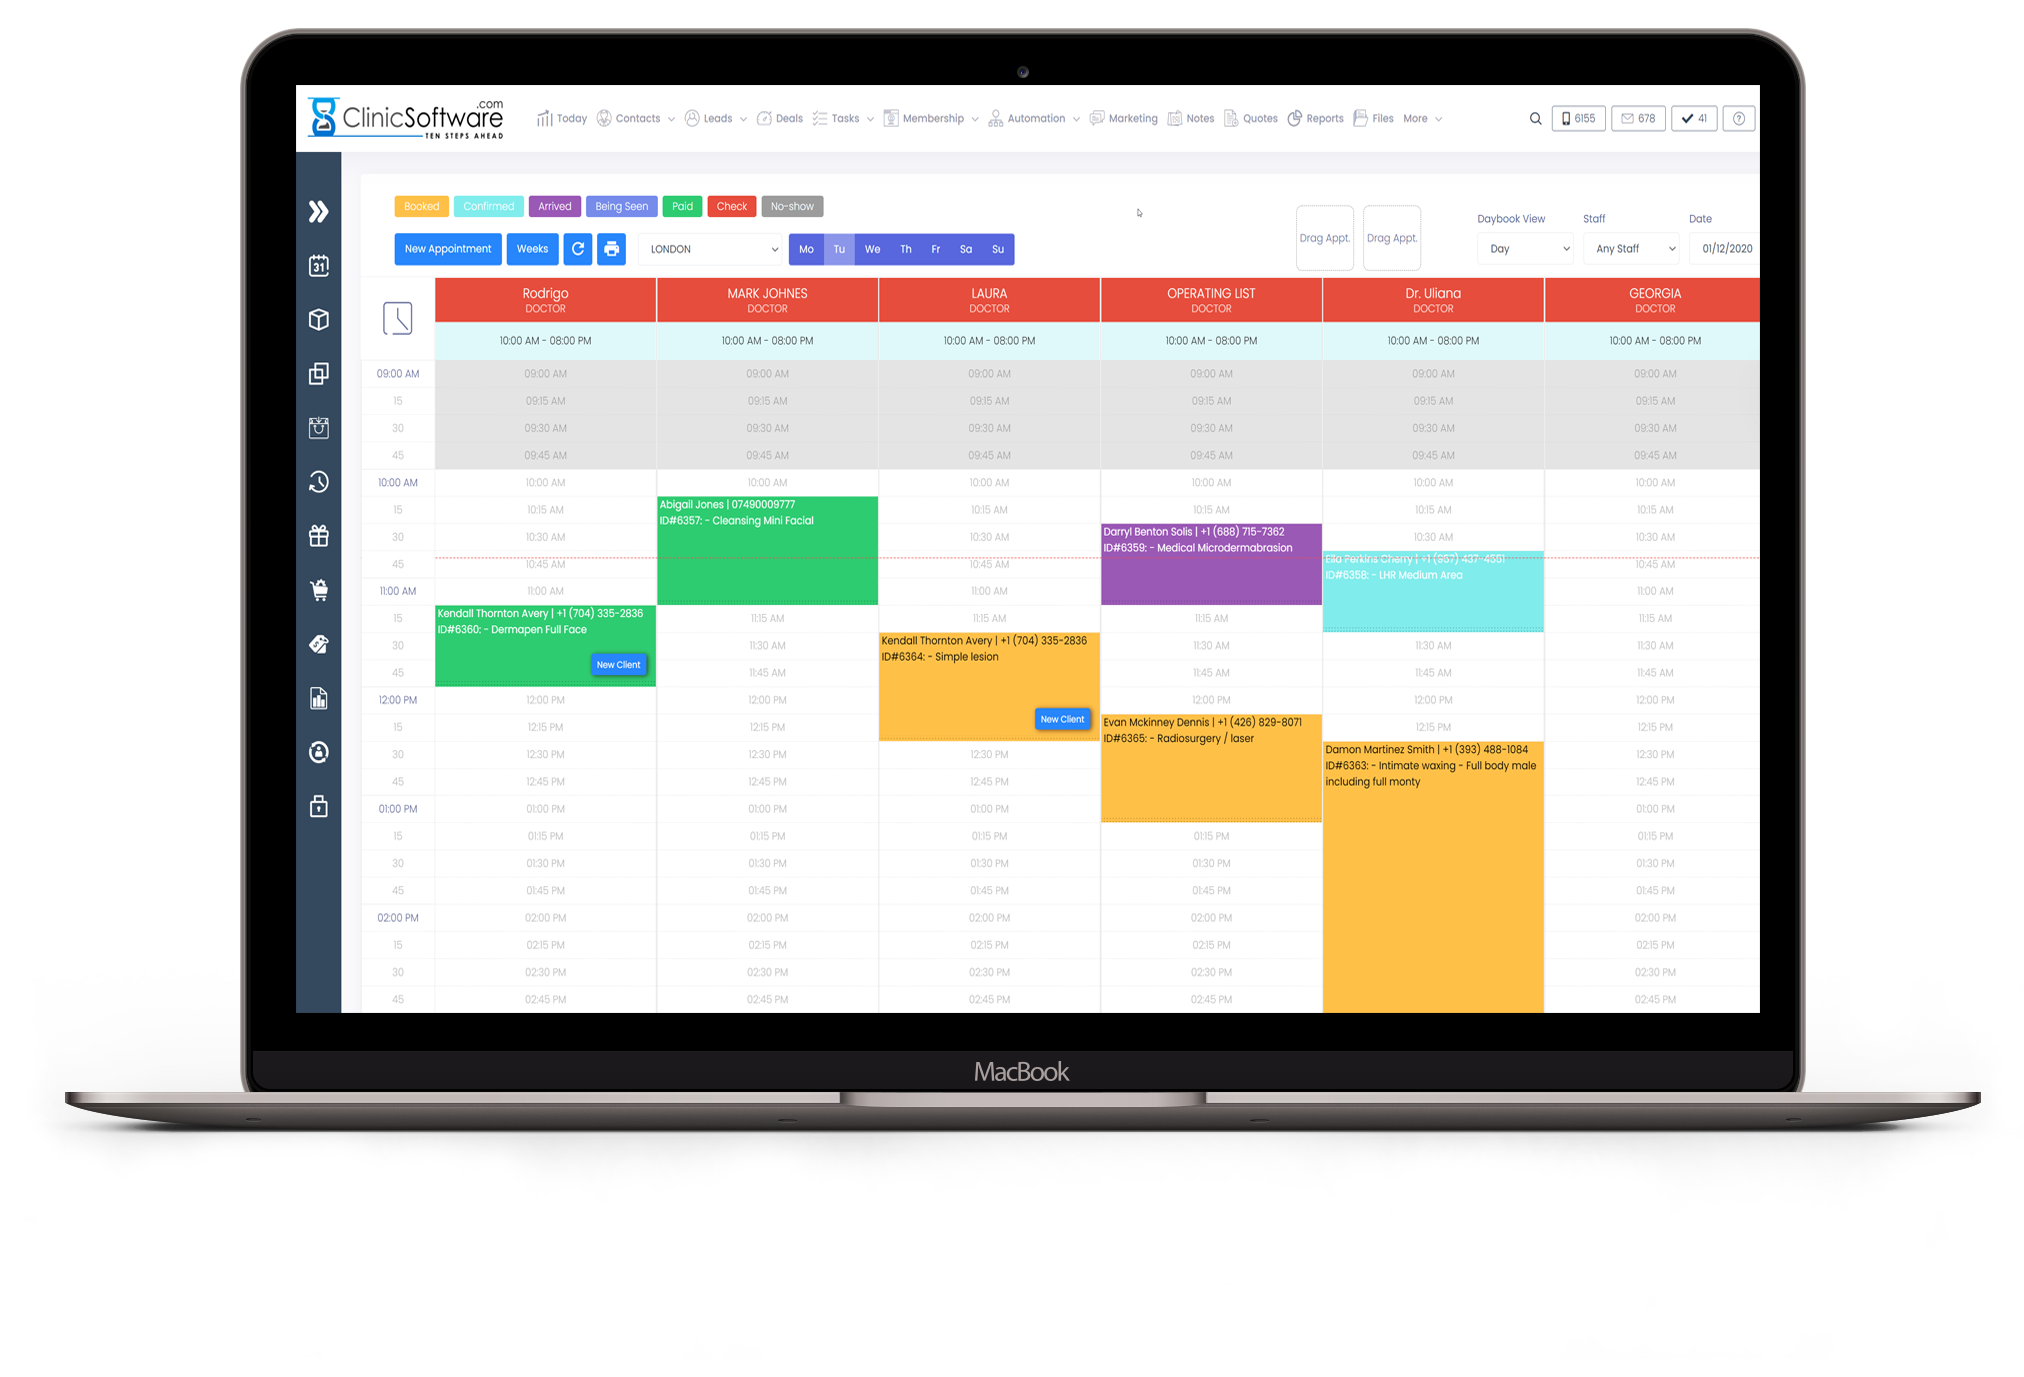
4.1. CALENDAR
The Calendar is the page from which you manage your appointments and waiting list. You can access the Calendar page from the “CALENDAR” button on the left menu (see above icon).
READ MORE
4.2. BOOKING A SERVICES TYPE APPOINTMENT
Please access the calendar so you can book your first appointment. Click on an empty time slot on the Calendar for the desired Staff and choose the “Add Appointment” option from the window that opens up (this will automatically select the staff and time in the New Appointment window) or press the “New Appointment” button from the top section of the page.
READ MORE
4.3. BOOKING A COURSES TYPE APPOINTMENT
Click on an empty time slot on the Day Book for the desired Staff and choose the “Add Appointment” option from the window that opens up (this will automatically select the staff and time in the New Appointment window) or press the “New Appointment” button from the top section of the page.
READ MORE
4.4. BOOKING A PATCH TEST TYPE APPOINTMENT
Patch tests are added in the system as part of a course directory (E.g. for the “Laser” course directory we can have different laser patch tests for each laser type for example).
READ MORE
4.5. APPOINTMENT DRINKS
When booking an appointment you can specify which beverages the client will be served upon arrival. The configured waiter will automatically receive an email with the selected beverages when the status of the appointment is changed to „arrived” by the receptionist.
READ MORE
4.6. APPOINTMENT RESOURCES
A resource refers to a room or a piece of equipment required to provide a particular service at your salon / clinic (e.g. tanning bed, massage room or laser machine). Resources are separate to each location and are assigned to services or courses through categories.
READ MORE
4.7. ADDING BUSY TIME ENTRIES
Select the duration and then press the “ADD BUSY TIME” button. You can also specify notes that will be displayed on the appointment in the Day Book.
READ MORE
4.8. EDITING OR REMOVING BUSY TIME ENTRIES
To edit or remove a busy time entry we must first click on it from the Day Book. To edit the busy time entry make the necessary changes (date, time, duration, staff or notes) and then press the “UPDATE” button.
READ MORE
4.9. APPOINTMENT DETAILS WINDOW
To open an appointment’s details window, click on the appointment from the Day Book. Each appointment type has a different “Appointment Details” window, the main difference between the different appointment types being the “Appointment” tab from the right column.
READ MORE
4.11. APPOINTMENT TREATMENT PROTOCOL
The “Treatment Protocol” feature lists the “Treatment Protocol” values for each treatment of the appointment. The treatment protocol is set individually per service and course from the Admin Area.
READ MORE
4.12. APPOINTMENT PRODUCT PRESCRIPTIONS
The “Product Prescriptions” feature lists the “Product Prescription” values for each treatment of the appointment. The product prescription is set individually per service and course from the Admin Area.
READ MORE
4.13. APPOINTMENT CONSUMABLES
The consumables system is designed to keep track of the products usage during normal clinic operation. It does this by allowing you to specify how much of a particular product you used during an appointment session and using that value to deduct the stock from the products.
READ MORE
4.14. APPOINTMENT SEND MESSAGE WINDOW
From this window, you can send an email or SMS message to the client specified in the appointment. The send message can include placeholders that will autocomplete with the client and appointment details.
READ MORE
4.15. MODIFYING THE APPOINTMENT TREATMENTS LIST
To remove a treatment from the treatments list, lick on the treatment and then press the “REMOVE FROM LIST” button. To add a new treatment to the list, click on the “Select Service/Course” drop box and then select the service/course. You can also search for the required treatments.
READ MORE
4.16. RESCHEDULING THE APPOINTMENT
To reschedule the appointment you can click and drag the appointment to a different empty slot within the Day Book or use the “Move” option from the “Appointment Details” window. The dragging of the appointment is useful for quick adjustments within the same day while the “Move” option also allows you to select a different location and date.
READ MORE
4.17. RESIZING THE APPOINTMENT
Please see the “RESCHEDULING THE APPOINTMENT” section of the User Guide for details on using the “Move” option.
READ MORE
4.18. CANCELLING THE APPOINTMENT
Select the reason/method, enter the cancellation notes and then press the “Confirm cancellation” button.
READ MORE
4.19. WAITING LIST
You can access the waiting list by clicking on the "Waiting list" button at the top of the Daily Book. To search for a client within the waiting list, enter the client's name / phone or e-mail in the "Search waiting list" field, then press the "Search" button.
READ MORE
5.:: COURSES / SESSIONS ::
How to add courses in the system will be covered in the Admin Area section of this user guide. How to book courses will be covered in the Day Book section of this user guide.
READ MORE
5.1. COURSES DETAILS
The “Courses” button will open the courses list page from which you can order new courses for the selected client or redirect you to the clients list page from which you can select a client.
READ MORE
5.2. TRACK SESSIONS
From this page, you can track each session based course progress, set session utilization status and delete the course. To search for a particular course use the “SEARCH TRACK SESSIONS:” filet on the top right.
READ MORE
5.3. TRACK MINUTES
From this page you can track each minute based on course progress, set the remaining minutes and delete the course. For minutes based courses, the minutes are deducted automatically when the course is booked (the system will ask you how many minutes do you wish to book from this course when adding an appointment from the Day Book).
READ MORE
5.4. INSTALLMENTS
From this page, you view and take payments for the client’s course instalments. To take payment of a course instalment search for the course in the “Instalments” page and press “SET PAID” for the instalment that you wish to take payment for.
READ MORE
5.5. POWER PLATES
From this page, you can manage Power Plates minutes usage. It will display the minutes left, used, last purchased power plates course, active course and usage history.
READ MORE
5.6. TANNING COURSES
From this page, you can manage Tanning minutes usage. It will display the minutes left, used, last purchased tanning course, active course and usage history.
READ MORE
5.7. CUSTOMER PROFILE
To access this page press the “Activity” button from the customer profile top left section. From this page, you can filter the timeline, send an email or an SMS to your customer, see the previous communication, see the added clinic notes, see the appointments, the receipts, the direct debit payments and added treatment records, just to name a few.
READ MORE
5.8. TREATMENT RECORD AND BODY COMPOSITION
From this page, you can keep manage laser treatment records (visit, date, machine specifications and notes). Viewing treatment record entries You can access the treatment entry you require by selecting it from the “Selected Entry:” drop box at the top of the page.
READ MORE
5.9. ADD PHOTO
From this page you set the client profile photo by uploading it or using your webcam. When you open this page the webcam will automatically turn on and display the video feed in the “From Webcam:” preview.
READ MORE
6.1. CLIENT REJUVENATION PROCEDURES
The rejuvenation feature allows you to keep a record of the face and body procedures (e.g. botulinum toxin and dermal fillers) and keep track of treatment progress with before and after pictures.
READ MORE
6.2. ADDING A NEW REJUVENATION PROCEDURE
To add a new rejuvenation procedure for the selected client, press the “New” button from the top right section of the page.
READ MORE
6.3. MODIFYING AN EXISTING REJUVENATION PROCEDURE
To modify an existing rejuvenation procedure, select the procedure from the client procedures list, make the necessary changes and then press the “Save” button. To select a procedure, tap on the preview image or press the “View” button of the procedure.
READ MORE
6.4. EXPORTING REJVUVENATION PROCEDURES
To export rejuvenation procedures, from the client procedures list page press the “Export” button of the procedure and then choose one of the export methods (Image, PDF or email PDF). When emailing the procedure PDF file you can specify the email address, subject and notes to include in the email.
READ MORE
6.5. COMPARING REJUVENATION PROCEDURES
To compare two rejuvenation procedures, press the compare button of the initial procedure and then select the procedure you wish to compare it to from the drop box. Select the procedure you wish to compare it with from the bottom right drop box.
READ MORE
6.6. REJUVENATION PATIENTS LIST
From this page, you have the ability to track all the face and body procedures of your patients in time and compare the evolution of their treatment. The patient profile image is displayed from the last face type rejuvenation procedure front image.
READ MORE
7.1. CLIENT CONSENT FORMS
The available consent forms can be accessed by pressing the “Consent Forms” button from the appointment window and then scanning the QR code with your tablet or iPad. After scanning the QR code the system automatically logs you in as staff, selects the client and opens the “Available Consent Forms” page.
READ MORE
8.1. LEADS INTRODUCTION
Automate replies in order to focus on leads, save time and grow your business. With our amazing marketing automation tool you can reply to their enquiries in 30 min.
READ MORE
8.3. CONVERTING A LEAD
To convert a lead, open the edit lead page and change the lead stage to "Converted" and click the "Update" button. Once converted you can access the client profile to send emails and texts or to book an appointment.
READ MORE
8.4. MARKING A LEAD AS JUNK
To mark a lead as a junk lead, open the lead from the leads table and click on the “MARK JUNK” button.
READ MORE
8.5. STATISTICS
Below the lead table we display a chart indication total number of leads vs converted. This chart can be shown by Week, Month (default) and Year, to change the source, use the dropdown from the top-right section of the chart.
READ MORE
8.6. REPORTING
You can view the number of leads, conversions, junk and percentages for total and by the lead owner by using the Leads Stats report. To access the report, go to Admin > Reports > Leads Stats.
READ MORE
9.1. STAFF ADMIN AREA
Please open the "Rota" page. From this page, you can clock in and out the staff, set and export the shifts time schedule and view the staff clocked in/out log.
READ MORE
9.2. MOBILE VIEW NAVIGATION
While viewing the online booking website from a mobile device we use the bottom navigation menu. The “MORE” button opens a menu from which you can access the selected client profile pages and consent forms.
READ MORE
9.3. CLIENTS LIST PAGE
From this page we can select clients to perform actions on their profile such as booking appointments, updating the profile data, signing consent forms and rejuvenation procedures.
READ MORE
4.BOOKING AN APPOINTMENT
Click on an empty time slot on the Calendar for the desired Staff and choose the “Add Appointment” option from the window that opens up (this will automatically select the staff and time in the New Appointment window) or press the “New Appointment” button from the top section of the page.
READ MORE
9.5. APPOINTMENTS / SHIFTS PAGE
Today I would like to show you how to use the Location Staff feature. From this page you can add your staff, set up the shifts and admin area permissions of the staff.
READ MORE
9.6. COUPON CODES
1.To add a new coupon code, press the "Add New" button. 2. To edit an existing coupon code, press the "Edit" button. 3. To delete an existing coupon code, press the "Delete" button.
READ MORE
9.7. REFERRALS
Do you have a referral program in your Clinic? If not, you really have nothing to lose and everything to gain by asking for referrals. Here’s why: Clinic referrals narrow down a future customer’s choices, there has never been more clinics for a client to choose from.
READ MORE
9.1.1. TASKS
In order to access the tasks feature click on the "Tasks" button from the menu at the top. As you can see below, here you have all the open tasks. For each task you can see: the ID of the task, the type, the title of the task including any notes and the different reminder notifications, the client's name for which the task has been created, the member of staff that has the task assigned as well as the due date of the task.
READ MORE
9.1.2. CREATING A TASK
In order to add the task, simply press the button labelled "Add Task".
READ MORE
9.1.3. COMPLETING, DELETING OR EDITING TASKS
Whenever a task has been completed, you can mark it as complete and that task will not longer show under "Open" tasks, instead it will be moved under "Completed" tasks to indicate that the task has been completed.
READ MORE
9.2.1. MARKETING AUTOMATIONS TREES EXPLAINED
To send an email to your client you have to type the email or create a template first. To create an email template or an SMS template, search in admin area “Marketing emails” or "Marketing SMS"
READ MORE
9.2.2. CREATING A MARKETING AUTOMATION
By activating an automation, you in fact power up the business and turn on the engine that moves triggers and actions from step by step until they reach the goal and the end of the sequence. An active automation runs 24/7 until you stop it or delete it.
READ MORE
9.2.3. CREATING EMAIL TEMPLATE
To add a new email template click on the button labelled "Add New" To edit an email template click on the button labelled "Edit" To delete an email template click on the button labelled "Delete"
READ MORE
9.2.4. CREATING SMS TEMPLATE
To add a new SMS template click on the button labelled "Add New" To edit an SMS template click on the button labelled "Edit" To delete an SMS template click on the button labelled "Delete"
READ MORE
9.2.5. CREATING CLIENT LIST/ADD NEW CLIENT
a.Go to Contacts from main page. 1b.Press on the add new button from right corner of the page. 1c. Add the details of the client on each page and press Add Client.
READ MORE
9.2.6. CREATING MARKETING CAMPAIGN
If you haven't create those already, not to worry, check section 9.2 part 1 and 5 where we teach you how to create a marketing automation as well as a clients list.
READ MORE
9B.2.1. CLIENT ACTIVITY
From this page, you can track the activity of your client. To access this page press the “Activity” button from the client profile top section. From this page, you can filter the timeline, send an email to your client, send an SMS to your clients or add a clinic note.
READ MORE
9B.2.2. BRAINTREE
"Braintree" is a payment service by PayPal where they give you the capability to take payments from cards and you will be able to see only the last 4 digits of the card and charge the client if you need to do this.
READ MORE
9B.2.3. CLIENT APPOINTMENTS
CLIENT APPOINTMENTS From this page, you can view the appointments history of the client. To access this page press the “Appointments” button from the client profile top section.
READ MORE
9B.2.4. CLIENT BALANCE
From this page, you can view the client account balance history (when the client has deposited or withdrawn funds from his/her account and the balance before and after the operation). To access this page press the “Balance” button from the client profile top section.
READ MORE
9B.2.5. CLIENT DRINKS HISTORY
From this page you can view each drink that the client had, on what date and appointment. To access this page press the “Drinks History” button from the client profile page.
READ MORE
9B.2.6. CLIENT PROFILE
From this page, you can view and edit the client details, view/email/print receipts, appointment history and clinic notes. To access the client profile press the “View ” button from the clients list page.
READ MORE
9B.2.7. CLINIC NOTES
To access this page press the “Clinic Notes” button from the client profile. From this page, you can view, add, edit and remove clinic notes. To add a new clinic note, press the “New Note” button.
READ MORE
9B.2.8. DELETING A CLIENT ACCOUNT (CLIENT PROFILE)
To delete a client account, from the client profile page press the “Delete Contact” button from the top right under the 3 dots. Only the staff with manager rights can perform this operation. A login window will open asking you to confirm your credentials.
READ MORE
9B.2.9. DIAGNOSIS RECORD
To monitor and manage your client's diagnosis, click the "Diagnosis Record" button. This section allows you to add new records, modify or delete existing entries, and export client records as needed.
READ MORE
9B.2.10. DIRECT DEBIT
To see the direct debit for a client press the "Direct Debit" button. To see and track the payments for a client press the "Payments" button. To create a subscription and charge a client a specific amount weekly, monthly or yearly press the "Subscriptions" button.
READ MORE
9B.2.11. EDIT PROFILE
From this page you can edit the client details, set notes, set client category and group, assign loyalty card, add and remove voucher barcodes, merge client accounts. To access this page press the “Edit” button from the client profile top section.
READ MORE
9B.2.12. FILES
From this page, you can upload/download, delete and organize your client files in folders. To download a file right click on the file and choose download. To upload a new file, right click on the empty space and then choose “Upload files”.
READ MORE
9B.2.13. LOYALTY POINTS
From this page you can allocate points based on how much your client is spending. Your client can exchange the points for credit or vouchers in his account.
READ MORE
9B.2.14. MEDICAL HISTORY
From this page you can see the medical history of your client. Here you have the capability to view, edit or delete an existing consent form of your client.
READ MORE
9B.2.15. MERGE CLIENTS
From this page, you can merge client accounts. To access this page press the “Edit” (1) button from the client profile and then press "Merge Clients" (2).
READ MORE
9B.2.16. RECOMMENDED PRODUCTS
In this page, you can see the recommended products of a client. To see this, open the client profile and press the "Recommended Products" button.
READ MORE
9B.2.17. WORKFLOW FORM
A Workflow Form is a sequence of tasks that processes a set of data. Workflows occur across every kind of business and industry.
READ MORE
9.3.0 :: ADMIN AREA INTRODUCTION ::
The ADMIN AREA is the section which handles all the administrative task of the software. The Admin Area can be accessed from the TOP menu by pressing the "cog" button.
READ MORE
9.3.1. ACCESS CONTROL LISTS
Each time when you add a new service or course, you must give the permission to at least one staff member to perform that treatment. This setting is mandatory if you want to enable the services or courses for booking.
READ MORE
9.3.3. CLIENT CATEGORIES
From this page, you can manage the client categories used for automatic notifications and services discounts. To add a new client category, press the “Add Client Category” button from the bottom of the page.
READ MORE
9.3.4. CLIENT CATEGORY NOTIFICATIONS
From this page, you can set up notifications to be sent by email to the staff on the client arrival (appointment “Arrived” status) based on the number of behaviour stars and client loyalty category.
READ MORE
9.3.5. CLIENT FEEDBACK / REVIEWS
From the client feedback page, you can view the feedback left by the clients from the online booking website. To filter the list by the Date, Review and Booking details, use the “Filter List” field located in the top-left section of the page.
READ MORE
9.3.6A. CONSUMABLES SYSTEM
The consumables system is designed to keep track of the products usage during normal clinic operation.
READ MORE
9.3.6B CONSUMABLES TREATMENTS
From this page, we can set up the consumables for each treatment (service/course/patch-test). To search for a particular treatment in the list, use the list filter field.
READ MORE
9.3.6C CONSUMABLES – STOCK
From this page, you can deduct the stock if the total allocated quantity of a consumable is equal or exceeds the whole size of the consumable.
READ MORE
9.3.7. COURSES AND SESSIONS
From this page, you can manage the courses in the system. There are 2 types of courses in the system: Sessions based courses, Minutes Based Courses
READ MORE
9.3.8. COURSES COMMISSIONS
From this page, you can set up the courses commissions based on lower/upper limits of the sales for the selected courses directory.
READ MORE
9.3.9. DISCOUNT SETTINGS
From this page you can set up the predefined discount options that appear in the “Discount” window (accessed from the main interface, bottom right “DISCOUNT” button).
READ MORE
9.3.10. FILE MANAGER
You can then drag your files directly inside the “Upload files” area or press the “Select files to upload” button to open the file browser of your computer.
READ MORE
9.3.12. HISTORY
The history page lists all items (services, courses, products) bought in the selected date interval. By default it shows the bought items of today.
READ MORE
9.3.13. INVOICE SETTINGS
From this page, you can set up the company details that appear in the top right section of the invoices generated through the Admin Area / Invoices page.
READ MORE
9.3.14. QUOTES
In order to create a quote, open the "Quotes" page from the admin area. From this page, you can download and issue new quotes To add a new quote press the top-right “Add Quote” button.
READ MORE
9.3.15. NO SALE (OPEN CASH DRAWER)
The “NO SALE” button prints out an empty receipt in order to open the cash drawer.
READ MORE
9.3.16. ONLINE BOOKING STAFF
The “ONLINE ACCOUNT” button is a link to the online booking website staff administration page from which you can log in as a client, view and modify appointments, sign consent forms and access rejuvenation procedures from your tablet computer.
READ MORE
9.3.17. PATCH TESTS
Patch tests are assigned to course directories; the system will keep track of what course the client has ordered after the patch test was added from the “PACTH TESTS” page or booked form the Day Book.
READ MORE
9.3.18. PATCH TEST COMMISSIONS
From this page, you can set up the patch test commissions based on the number of client returns. The commission settings are used in reports such as “Commissions Sheets”.
READ MORE
9.3.19. POWER PLATES COURSES
From this page, you can manage the power plates courses of the system. The power plates courses allow you to specify a daily minutes use of the machine for the duration of the course, expressed in days or months.
READ MORE
9.3.20. PRODUCT CATEGORIES
From this page, you can manage the product categories. To add a new product category, simply type in the product category title and press the “Add new category” button.
READ MORE
9.3.21. PRODUCTS
From this page, you can manage the products from admin area. To filter the products list, use the search field, location and category drop boxes.
READ MORE
9.3.22. PROMOTIONS
From this page, you can set up promotions that appear in the main PROMOTIONS page. The promotions represent a bundle of services, courses and products with a discount applied per bundle.
READ MORE
9.3.23. QUICK ACCESS MENU
From this page, you can configure the items shown in the quick access menu. The quick access menu contains shortcuts to various admin area pages and other features.
READ MORE
9.3.24. REFUND MODE
From this page, you can refund client receipts. By default, today’s receipts are listed. To view the receipt from another date, click on the “View by date” field and select the date.
READ MORE
9.3.25. REPORTS
Using the reports you can: - List all orders with client name, id, date, location, staff, payment type, amount paid for each payment type and order total;
READ MORE
9.3.26. REPORTS SETTINGS
From this page, you can configure the parameters of certain reports (E.g. KPI and Staff Performance reports). The parameters are saved in 2 variants: “Default Value” and “Salon Value”.
READ MORE
9.3.27. RESOURCES
Required resources are resources with the “Required resource (must be added to list in order to complete the booking)” parameter from the add/edit page set to active and are prefixed with “*” and displayed in bold text.
READ MORE
9.3.28. RESOURCES CATEGORIES
From this page, you can manage the resource categories that can be assigned to services and courses to specify the resources that each service or course use.
READ MORE
9.3.29. SI UNITS (UNIT TYPE)
From this page, you can manage the units shown in the products and consumables pages. Fill in the fields with the units that you use and then press the “Save changes” button located in the bottom section of the page (scroll down).
READ MORE
9.3.30. LOCATION DAILY TARGETS
From this page, you can manage the salon/location daily targets used in the reports. Daily targets are set by location. To change the location, use the top “Location / Salon” drop box.
READ MORE
9.3.31. LOCATION SUNDRIES
From this page, you can manage the salon/location sundries used in the reports. Sundries entries are added per location. To change the location, use the top “Location / Salon” drop box.
READ MORE
9.3.32. LOCATION TILL FLOAT
From this page you can manage the salon / location till float used in the reports. Till float entries are added per location. To change the location, use the top “Location / Salon” drop box.
READ MORE
9.3.33. SERVICES
From this page, you can manage the services in the system. The services can be available at one or all locations. To display the services available at one location, select the location from the top drop box.
READ MORE
9.3.34. SERVICES CATEGORIES
From this page you can manage the services categories in the system. The services are organised into sections (main category) and categories (subcategory of the section).
READ MORE
9.3.35. SERVICES COMMISSIONS
From this page, you can set up the services commissions based on lower/upper limits of the sales for the selected services category.
READ MORE
9.3.36. SPENDING PRIVATE
From this page you can track the private spending of the staff. To view the spending for a different date, click on the “View by date” field and choose the date.
READ MORE
9.3.37. SPENDING SALON
From this page you can track the spending on the salon / location. To view the spending for a different date, click on the “View by date” field and choose the date.
READ MORE
9.3.38. STAFF COMMISSIONS
From this page you can set up the commissions of services, courses, products and patch tests for each individual staff.
READ MORE
9.3.39. STAFF CONTACT DETAILS
From this page you can view the contact details and next of kin of each staff member. To search for a staff member, type the name or phone number of the staff in the search field and then press the “Search” button.
READ MORE
9.3.40. STOCK
From this page, you can view and manually edit the storage room stock values of each product. To filter the list by category, select the category from the top section drop box.
READ MORE
9.3.41. STOCK TAKE
From the "Stock" page, you can view and manually edit the storage room stock values of each product. The software automatically sends a reminder to re order stock once a certain amount of units are left.
READ MORE
9.3.42. STOCK TAKE REQUESTS
From this page, the staff can print / export PDF of the stock requests to send them for provisioning and then confirm the quantity that has arrived at the salon/clinic.
READ MORE
9.3.43. STORAGE ROOMS
From this page, you can manage the storage rooms at each location. To display the storage rooms from another location, select the location from the location drop box located in the top left section.
READ MORE
9.3.44. TANNING PRICES
From this page, you can manage the tanning courses that are used in the “COURSES / SESSIONS” / “Customer Profile” / “Tanning” page.
READ MORE
9.3.45. CUSTOM FIELDS
The custom fields can be changed from Admin > Custom Fields. When adding a custom field you can specify if the field will be used for a contact, lead or both. If lead or contact_lead is selected then the field will be displayed under the new lead window.
READ MORE
9.3.46. MARKETING SOURCES
The lead sources field displayed in the new lead window can be changed from the Admin Area > Marketing Sources page.
READ MORE
9.3.47. LEADS STATUS / STAGE
The values under the lead stage can be changed from the Admin Area > Lead statues page.
READ MORE
9.3.48. CONSENT FORMS
Access the Consent Forms from the Admin panel. To access the admin panel for the consent forms, press the 'Consent Forms' button from the left menu before accessing the main software.
READ MORE
9.3.49. CONSENT FORMS TEMPLATES
In order to access our database of consent form templates, please open the "Consent Forms" page from the admin area, then click the "Library" button.
READ MORE
9.4.1. - 2 (TWO) WAY EMAIL COMMUNICATION
To send an email to a client open the client profile and then press the "Send email" button. Select an email template and press the "Send email" button.
READ MORE
9.4.2. - 2 (TWO) WAY SMS TEXT COMMUNICATION
To send an SMS to a client open the client profile and then press the "Send SMS" button. Select an SMS template and select the appointment and then press the "Send SMS" button.
READ MORE
07. REFERRALS
Do you have a referral program in your Clinic? If not, you really have nothing to lose and everything to gain by asking for referrals.
READ MORE
9.5.1. ONLINE SHOP
If you want to use the online shop feature you need to ask the support team to activate this feature for you. After the online shop is activated you will see the "SHOP" button on the menu of the online booking platform.
READ MORE
9.5.2. ONLINE SHOP ADMIN AREA
This feature will give you the capability to edit the products setting of the online shop. Inside the admin area search: "PRODUCTS".
READ MORE
9.6.1. SENDING EMAILS
To send an email to your client you have to create a template first. To create an email template search in admin area “Marketing emails”. This will open the marketing emails template page.
READ MORE
9.6.2. SENDING SMS TEXTS
To send an SMS text to your client you have to create a template first. To create an SMS text template search in admin area "Marketing SMS".
READ MORE
9.7. IOS AND ANDROID APPS
As you consider software solutions, it’s important to consider that the modern team, they are always on, always connected, and incredibly mobile.
READ MORE
9.8. VIDEO ONLINE CONSULTATION
Claim your own personalized URL (request via ticket). Customize your meeting experience with branded emails and texts
READ MORE
10.1. MEMBERSHIP
THERE ARE 2 TYPE OF SERVICES THAT CAN BE ADD: MEMBERSHIP SERVICES AND A SERVICE THAT A CLIENT CAN BOOK
READ MORE
10.2. MEMBERSHIP USER GUIDE
To add a membership go to the Admin Area, then open the "Memberships" page and click on the “Add New” button from the top-left section. After the membership was added the system will redirect you to the events page of the newly added membership.
READ MORE
Client Feedback Automation
CRM includes a powerful automated feedback feature that streamlines the way clinics gather client satisfaction insights immediately after appointments.
READ MORE