
To open an appointment’s details window, click on the appointment from the Day Book.
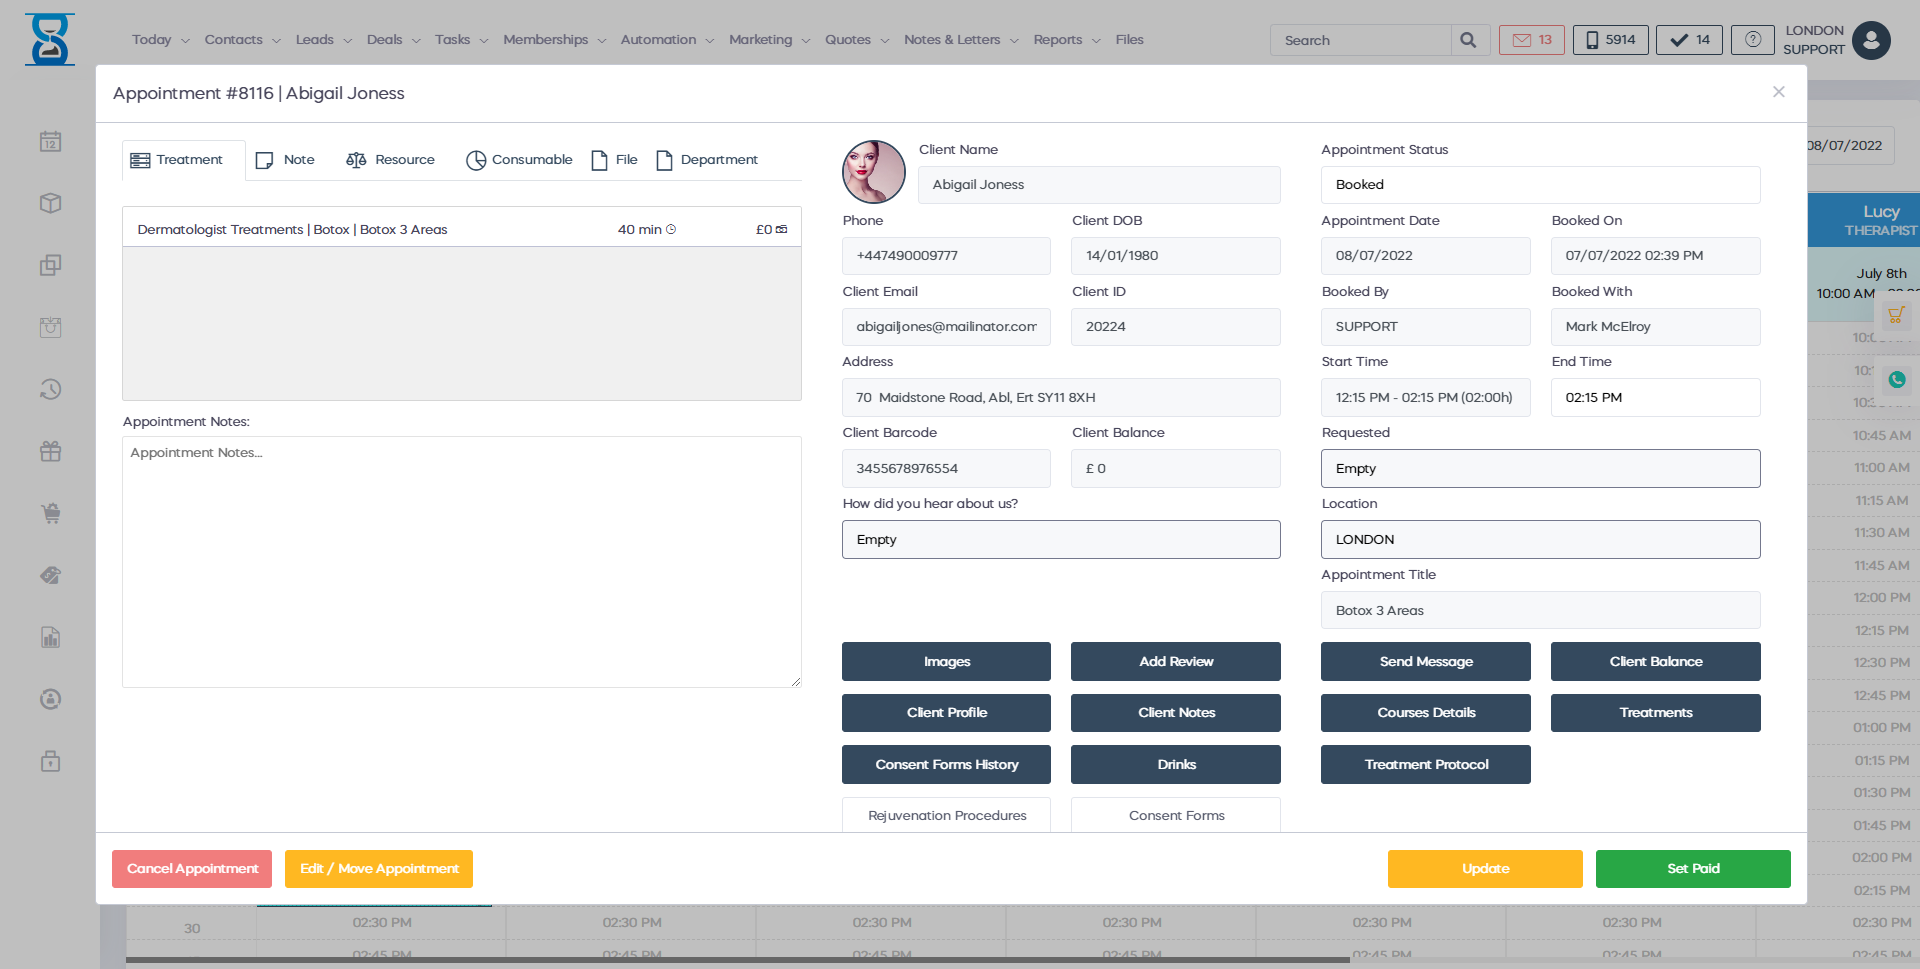
The appointment details window is divided into 2 columns:
- The left column which displays the appointment and client details and also includes the appointment main controls.
- The right column which displays the appointment treatments, notes, prescriptions, client files and the cart.
There are 3 types of appointments in the system:
- Services appointments
- Courses appointments
- Patch Test appointments
Each appointment type has a different “Appointment Details” window, the main difference between the different appointment types being the “Appointment” tab from the right column.
We will cover the similarities first and then go into detail for each appointment type.
We include the following appointment details for all appointment types:
- Appointment title
- Date
- Start Time
- Staff
- Duration
- Type (e.g. Walked in, email, phone)
- Booked by
- Booked on
- Status (booked, confirmed, arrived, paid, check)
- Appointment notes
We include the following client details for all appointment types:
- Account balance
- Name
- Phone
For each appointment type we have the following controls:
- Client Notes (opens a window from which you can view and edit the combined client notes)
- Clinic Notes (opens the client profile/clinic notes page)
- Sign Form (generates an authentication token and displays a QR code from which you can log into the online booking application and have the client sign the available consent forms.)
- Forms (similar to the “Sign Form” but displays the forms already signed by the client)
- Rejuvenation (generates an authentication token and displays a QR code from which you can log into the online booking application rejuvenation section)
- Customer profile (opens the client profile page)
- Images (opens the Appointment Images window from which you can take before and after images)
Please refer to the “Appointment Images” section of the User Guide for more details. - Resources (opens the Appointment Resources window).
Please refer to the “Appointment Resources” section of the Use Guide for more details on how to manage appointment resources.
- Drinks (opens the Appointment Drinks window.
Please refer to the “Appointment Drinks” section of the User Guide for more details.
- Treatment Protocol (opens the Appointment Treatment Protocol window)
- Consumables (opens the Appointment Consumables window)
- Product Prescriptions (opens the Product Prescriptions Window)
- Send Message (opens the client Send Message Window)
- Cancel (Cancels the appointment, will open the Cancel Appointment Window)
Please refer to the “Cancelling an appointment” section of the User Guide for more details. - Set Paid (Updates the status of the appointment to “Paid”, for services type appointments it also adds the services of the appointment into the cart and redirects you to a page from which you can take the payment by pressing the CASH/CARD buttons.)
- Update (Updates the appointment status and end time, for services type appointments if the status is changed to “Paid” it also adds the services of the appointment into the cart and redirects you to a page from which you can take the payment by pressing the CASH/CARD buttons.)
- Edit (opens the Appointment Edit window from which you can modify the appointment’s treatments list)
Please refer to the “Modifying an appointment” section of the User Guide for more details.
- Move (opens the Appointment Reschedule window from which you can change the location, date, start time, end time and staff)
Please refer to the “Rescheduling an appointment” section of the User Guide for more details. - Print (prints the appointment details)
- Close (closes the Appointment Details window)
For course type appointment we also include the “Track Sessions” button form which you can access the client Track Sessions page.
For patch test type appointment we also include the “Patch tests” button from which you can access the client PATCH TESTS page.
APPOINTMENT DETAILS / APPOINTMENT TAB (SERVICES)
For services type appointments, the “Appointments” tab displays the appointment’s services list.
APPOINTMENT DETAILS / APPOINTMENT TAB (COURSES)
For courses type appointments, the “Appointments” tab displays the appointment’s courses list together with the payment data (paid of total, remaining payment and the instalments list including the date and session number that the instalment was paid on).
Course payment:
From this tab, you also have the ability to take payment on the course’s instalments directly.
The system highlights the courses that are not fully paid for easy identification when a payment needs to be taken:
Fully paid courses will feature a green background on the payment section:
Partially paid courses will feature a yellow background on the payment section:
Courses that have no payments taken will feature a red background on the payment section and the message “CLIENT MUST PAY BEFORE STARTING THE COURSE SESSION!”
To take payment of a course instalment press the instalment’s “SET PAID” option.
The system will automatically select the client, add the instalment to the cart and redirect you to the client’s instalments page from which you can finalize the payment by pressing the CASH / CARD buttons.
Press the “SET PAID” button of the course’s instalment:
The system will redirect you to the client’s instalments page; notice the instalment that we have clicked on has been added to the cart:
Press the CASH / CARD buttons to finalize the payment:
The “SET PAID ON APPOINTMENT DAY” will set the date of the receipt to that of the appointment:
The “SET COURSE FULLY PAID” and “SET COURSE FULLY PAID ON APPOINTMENT DAY” will add all of the remaining instalments to the cart.
APPOINTMENT DETAILS / APPOINTMENT TAB (PATCH TEST)
For patch test type appointments, the “Appointments” tab displays the appointment’s patch test page.
This page is similar in functionality as in the main “PATCH TEST” page.
Note:
When a patch test type appointment is booked, the selected patch test is added to the client account automatically by the system similar to how you select the patch test from the "Selected Free Patch Test Course” inside the “PATCH TEST” page and then press the “Add Patch Test” button.
From this page, you can update the patch test that has been added automatically on booking the patch test.
To update the patch test select the status from the “Patch Test Status” drop box, fill in the “Area Interested” and “Course Recommendations” fields and then press the “Update Patch Test” button.
The same restrictions as in the main “PATCH TESTS” page apply as in only a staff with manager rights is allowed to update an existing patch test.
The “Order Courses” button will open the “COURSES / SESSIONS” / COURSES if you need to order a new course.
APPOINTMENT DETAILS / NOTES TAB
From this tab, you can manage a client’s appointment notes with references.
The notes can be searched by date, note content and note reference.
The notes tab can be configured to show only the notes associated with the current appointment by ticking the “Show for this appointment only” checkbox as illustrated below:
To add a new appointment note, press the “New” button from the top section:
The “New Note” window will show up:
Fill in the note and reference (optional) fields and then press the “SAVE” button.
After adding the new note, the notes list will automatically be reloaded to show the new note.
The notes are listed by date in descending order.
To search for a note by date use the “From Date” and “To Date” fields and then press the “Load” button:
To search a note by its contents or by the reference, fill in the “Search Note, Reference” field and then press the “Load” button:

To edit a note, first, click on the note’s pencil icon:
The “Edit Note” window will show up:
Make the necessary changes and then press the “SAVE” button.
To delete a note, click on the note’s bin icon:
APPOINTMENT DETAILS / PRESCRIPTIONS TAB
From this tab, you can manage a client’s prescriptions.
The prescriptions can be searched by date and content.
The prescriptions tab can be configured to show only the prescriptions associated with the current appointment by ticking the “Show for this appointment only” checkbox as illustrated below:
To add a new prescription, press the “New” button from the top section:
The “New Prescription” window will show up:
Fill in the prescription field and then press the “SAVE” button.
After adding the new prescription, the prescriptions list will automatically be reloaded to show the new prescription.
The prescriptions are listed by date in descending order.
To search for a prescription by date use the “From Date” and “To Date” fields and then press the “Load” button:
To search a prescription by its contents, fill in the “Search Prescription” field and then press the “Load” button:
To edit a prescription, first, click on the prescription’s pencil icon:
The “Edit Prescription” window will show up:
Make the necessary changes and then press the “SAVE” button.
To delete a prescription, click on the prescription’s bin icon:
APPOINTMENT DETAILS / FILES TAB
From this tab, you can manage a client’s files.
The files can be searched by date, file name and file description.
The files tab can be configured to show only the files associated with the current appointment by ticking the “Show for this appointment only” checkbox as illustrated below:
To upload a new file, press the “New” button from the top section:
The “New File” window will show up:
Press the “Choose File” button from the top section of the window to open the file browser on your computer.
Navigate to the file that you wish to upload, select the file and then press the “Open” button.
Fill in the description field (optional) and then press the “SAVE” button.
After adding the new file, the files list will automatically be reloaded to show the new file.
The files are listed by date in descending order.
To search for a file by date use the “From Date” and “To Date” fields and then press the “Load” button:
To search a file by its name or description, fill in the “Search File” field and then press the “Load” button:
To edit a file’s description, first, click on the file’s pencil icon:
The “Edit File” window will show up:
Make the necessary changes and then press the “SAVE” button.
To delete a file, click on the file’s bin icon:
To download a file to your computer, press the file’s “Download” button:
APPOINTMENT DETAILS / CART TAB
From this tab, you can view the system cart and change the prices of items.
Below the Cart Total field we have the following buttons:
- Add Service (opens the SERVICES page)
- Add Course (opens the COURSES / SESSIONS page)
- Add Product (opens the PRODUCTS page)
- Discount (opens the SERVICES page from which you can access the cart DISCOUNT button located in the lower left area of the POS right column)
To change an item’s price click on the item’s pencil icon:
The “Edit Cart Item” window will show up:
Type in the new price and then press the “SAVE” button.
To remove an item from the cart, click on the item’s bin icon: